What are you looking for?

Wednesday, 29 November 2017

Front slit kurti

Hi friends, been a long time since my last post. I stitched a front slit dress today. 
Missed taking photos step by step. But I will try to explain the method. 
As usual cut the cloth for a Kurti top. 
Take the front portion and cut in half exactly. 
Since my neck has a pointed edge so it was easy to mark the centre. 
Then I took a 1  1/2inch width cloth of the length of the cut. 
Take the left hand side and keep the right side of Patti cloth on the right side of the cloth. 
Stitch along the edge. 
Turn the Patti over and fold it towards the inside. 
Take a black piping and keep along the edge. 

Now for the other side. 
Keep the Patti right side facing right of cloth and stitch along the edge. 
Now like we keep Button Patti for blouse hooks, fold the cloth in half and keep the edge of the Patti along the edge of the wrong side of the top and stitch. 
As we are keeping the slit, measure the length of the slit and at that marking  cut the Patti width wise. 

Now to cover the raw edge of the remaining length push the Patti cloth to the wrong side and stitch along the edge like the first side. 
Finish the neck as usual using cross Patti. Then give black Patti for neck. 
If you have any queries you can always ask. 
Proceed with the top as usual for sleeves, slit and bottom. 

Tuesday, 19 September 2017

Sling bag using mat weaving technique

Hi friends, I had seen a video of mat weaving technique to stitch floor mats or table coasters.
So I thought I could try this technique in a sling bag.
1.   I took synthetic cloth and made small strips of length as required for the width of the bag. I took two alternate colours and placed them at right angles to each other.
2.  As in mat weaving we need to move one colour cloth up and down the other colour.
3.  Then I stitched this basic mat by hand to hold the pattern together.
4.  Place it on another cloth of same dimension and stitch the four sides.
5.  Now remove the handmade stitches.
6.  Place this pattern on the cloth of the sling bag and fix it in all sides.
7.  To cover the raw edges use the same cloth as in the mat design as piping.
8.  Now attach the zip.
9.  Stitch the sides.
10.  Attach the handle of the bag.

This is one side. 


Now for the other. 
Hope you all like it. 
Will try this idea more in the future. 

Wednesday, 30 August 2017

Feather stitch - - four lines variation

This variation is done using four parallel lines.
The first stitch is started at the same point as the starting point on the third line. 
The needle comes out at a point lower than the earlier point on the second line. 
The second stitch is done by putting the  needle at the same point as the point on the second line,  on the fourth line. 
The needle comes out at a lower point on the third point. 

This is how the stitch will look when done. 
The thread is fixed on the leftmost line. 
The next stitch is done at the same point on the second line and brought out at a lower level on the second line. 
This continues till the fourth line in the right. 
Then we move step by step to the left. 


This will be the final look of the stitch.

Tuesday, 29 August 2017

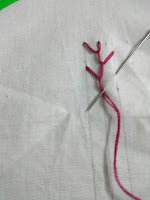
Feather stitch

This stitch is done using three lines or four parallel lines. 
I have used three lines here. 
The thread is fixed on the leftmost line. 
The first stitch is done by putting the needle at the same point on the middle line. 
The thread is kept in front of the needle. 
The needle is brought out at a lower point on the middle line. 
We get a U shaped stitch. 

For the next stitch put the needle on the right side line at the same point where the first stitch ended. 
The second stitch is done when the needle is brought out at a lower point on  the middle line. 
This way we work from left to centre and right to centre getting a full line of stitches. 
You can use your imagination to beautify it further. 

I have spaced the lines away from  each other for clarity, but this stitch will look better if the lines are closer to each other. 

This is another variation with three lines. 


In this variation the first stitch is done at a point on the second line similar to the
 the starting point   where the thread is fixed. 
The needle is brought out at a point lower than the starting point in between the two lines. 

The next stitch is started by putting the needle  into the cloth at the midpoint and brought out at the upper point of the second line. 

The next stitch is done by putting the needle into the same point on the third line and brought out at a lower point in between the third and second lines. 

The third stitch is done by using the midpoint of the two stitches and brought out at a lower point on the second line. 

This is how it will look when done.
I have tried to use Feather stitch in this neckline with herringbone stitch. 

Monday, 28 August 2017

Double herringbone stitch

First a row of herringbone stitch is done.

Then a contrast coloured thread is used to do double herringbone stitch. 
First the thread is fixed in between two stitches. 
Moving the needle below the second stitch to the lower line, a herringbone stitch is done as usual. 

To work the second stitch move the needle over the existing third stitch and do a regular herringbone stitch. 
For the next stitch again move under the existing thread and do the stitch. 
This process is continued to get a full row of stitches. 

The basic idea of herringbone stitch is that the second stitch overlaps the first one. 
Similarly in double herringbone stitch the first stitch is done by moving under the existing thread. 
The second stitch moves over the thread thus overlapping the first stitch. 
l
I have used this stitch along the edge of the neckline. 

Wednesday, 23 August 2017

Herringbone stitch as filling stitch

I have used this stitch to fill the design. First fix the thread on to cloth at a point. 
For the first stitch make a small stitch. 
Similarly for the second stitch also make a small stitch. 
Since it is a petal so I have considered the two lines of the petals as the lines to do the stitch. 
As you can see the the stitches are made very close to each other. 
We can start the new stitch at a short distance from the end of the previous one and bring it out at a point before the end of the previous stitch. 
I hope I am making my point clear. 
Tomorrow I will draw the pattern for this stitch for clarity.
Please bear with me tonight. 

In the above picture I have tried to pictures three consecutive stitches. 

The first step is to fix the thread at 1.
For the first stitch move the needle below the cloth at 2 and come up at 3     Then bring the needle to 4and move it under the cloth. 
For the second stitch bring the needle up at 5.  Moving to the other side move the needle under the cloth at 6 and bring it out at  7.  For the second stitch to be complete push the needle under the cloth at 8. 
For the third stitch bring the needle up at 9.  Move to other side by pushing the needle down at  10 and come up at 11.
The third  stitch is completed  by pushing the needle down at 12. 
Hope I have made the procedure clear. 
Just follow the same procedure to fill the entire design like I have. 
For the knaves I have used 4stranda of thread and you can see the criss cross pattern clearly. 


Herringbone stitch

Draw two parallel lines for this stitch. 
As always first step is to fix the thread on to cloth. 

The thread is fixed on the upper line. Now move the needle on the lower line at a point to the right side of the starting point. 
Bring it out at a short distance. 
While doing this the thread is kept behind the needle. 
Next we move to the upper line. Again the needle is put into the cloth and brought out at the same distance as the second stitch. 
This is how the stitch looks. 
This process is continued. Care should be taken to keep the thread behind the needle. 
I have used this stitch on this flower design. 

Wednesday, 16 August 2017

Kutchwork four square motif - - filling

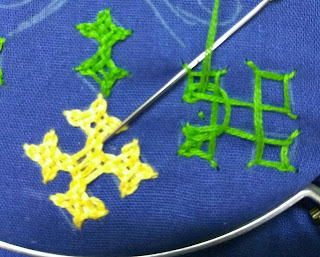
The filling of the motif is started by fixing the thread in the middle of a square. 
The needle is woven around the motif by looping the thread. The needle is inserted under the extended arm of the square. 

The next step is to weave through the the arm of the square. 

The next turn is to weave through the next extended arm. 
Care should be taken to weave up and down the arms of the square. 

Now we move towards completing the first  square by weaving up and down the motif and threads worked around. 

The first square is done. This procedure is repeated to finish the four squares.