What are you looking for?

Thursday, 29 March 2018

Shoulder bag--2

Hi friends, I stitched another shoulder bag using two contrast colours, cream colour with red printed cloth.
I have first attached lining cloth on the inside.

Then I stitched the red cloth at the sides and the bottom by placing it along the bottom so that we get a wide red pocket. 
Now for the handles. I place it on each side of the bag like an inverted U. 

From this picture I will give you the dimensions again. 
Cream cloth 13"by 15".
Red cloth 71/2" by 15".
Handles 4 feet, because it has to cover the length of the bag twice and have an extension for handling on the shoulder.
When we fix the handle in an inverted U shape we get three pockets,two pockets 3" wide and one 7"wide.

If you notice there is a gap of 5" between the handles in the side of the bag where we join the two sides.
Here I have added a Patti of width 1" and length 5" by stitching only on top and bottom. 
This is done on both sides. 
Now I inserted a smaller band of cloth say 1/4"width of length 18" into this Patti and tied a knot thus pulling the end of the Patti closer. This will help to reduce the size of the mouth of the bag to 11".
Hence the shape. 

Hand bag

Hi friends, I have used two  contrast coloured clothes in this bag.
I have used lining cloth inside to give some strength to the bag.
So first join the two contrast cloth and take lining cloth of total length and attach on the inside.

I have done Kutch work in the green part.

For the handle I rolled newspaper in a tight roll and used the green cloth to cover the paper and stitched on the roll. At first I thought of inserting the paper into the green colour Patti cloth. But then I realized that by stitching on the roll, we can get some sturdiness to the handle.

The basic idea is to stitch a bag economically.
I have attached a zip to the opening.
There is a very easy method to fix the zipper.
First take two small rectangular clothes of width 2inches by length 4inches.

Fix this clothes to the two ends of the zipper.
Now place the right side of the cloth on the zib and stitch along the raw edge. Once it is done if we turn the cloth right side up the raw edge will go down. To get a good finish you can put a stitch on the edge of the right cloth too.
Now do this for the other side of the zib.

If we do not have a zipper footpedal, then as we stitch the zib, we can slowly open or close the zib to ease out the stitching.


This drawing will show you the easy method of fixing a zib.
 As you can see I have taken an 8"zib. Take two rectangular pieces of 2"by 4" and fix on either side of the zib by folding the raw edges inside.
Now in the second drawing you can see that I have placed the cloth right side facing the zib and stitched along the dotted line. 

Now turn the cloth out and put a stitch again on the dotted line to fix the cloth perfectly on the zib. 
Do this for the other piece also.
Then fix the handles and stitch the side to get this beautiful hand bag. 

Thursday, 22 March 2018

Shoulder bag - - 1

I have used an orange colour cloth with red plain cloth for its base.

Box cut is 2inches by 4inches
Pocket - - 8inch square. 
As you can see these are two pieces for the bag. One of them has a pocket towards the inside.
Now I have attached the three pieces. 

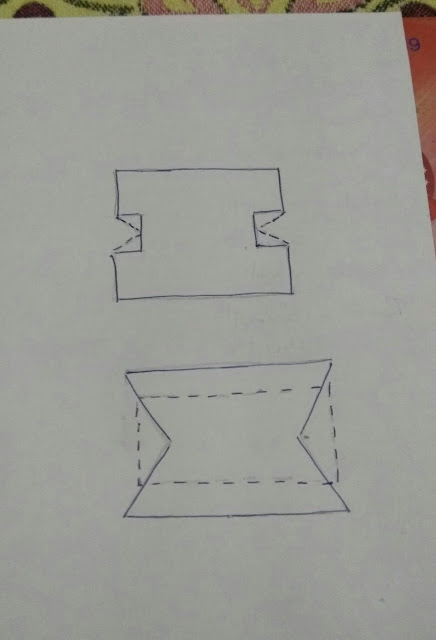
I hope this drawing is self explanatory of the dimensions. I will repeat below,
Orange cloth is 14" by 12".
Red cloth is 14"width  with a box cut of 2" by 4" for the flat base.
Handle is 2"wide cloth which is double folded to put the raw edge inside of length 22".


From this drawing I hope to clarify how I stitched the base red cloth.
I have stitched it after attaching the orange pieces too but for your understanding I have shown only the red piece. 
First the 2"inches box fold is stitched to the 4"flap.So 2" from each side will come and sit perfectly on the 4" side. 
Now stitch along the dotted line shown between the red edges. So now flat base will be narrower than the mouth of the bag. 

To beautify the bag I have used five pieces of 5"square, four pieces of 4"square, three pieces of 3".
Now to attach all the pieces to get a beautifully hand stitched flower. 

Wednesday, 21 March 2018

Cushion cover using cathedral window quilting method - - 2

Just as in my earlier post we have to stitch one more side of the cushion cover. Then attach a cloth of lesser width to one side, a wider width cloth to another side.

Now keep both the pieces on top of each other with right side facing each other and stitch along the three sides to get the cushion cover. 

Cushion cover using cathedral window quilting method - 1

Hi friends, I have seen a video on how to stitch a cathedral window quilt. I have used three different clothes to stitch this cushion cover one is printed and the other two are plain.

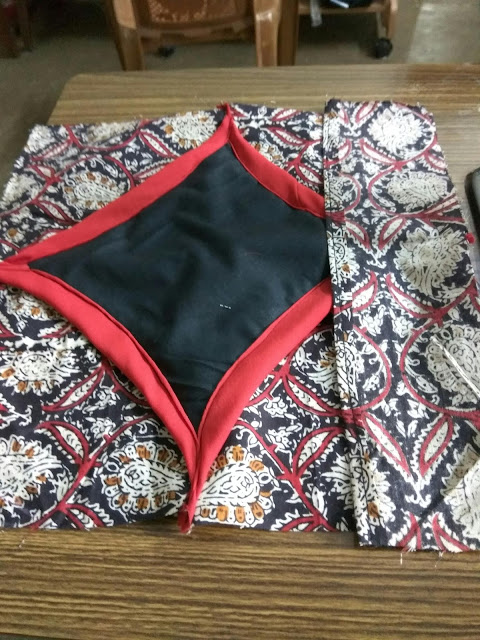
First place the red coloured cloth in a triangular shape along the Centre.
Then place the four clothes with the red cloth in the middle and stitch along the side. 
Stitch one more piece like this and keep one on top of the other, right side facing each other and stitch along the side. 
Keep the black cloth on top and use a safety pin to avoid the movement of the black piece. 
Now pull the red cloth towards the Centre and stitch along the edges. 

https://m.youtube.com/watch?v=akKU0zg-qaw
Please watch this link to get a better idea. 

Wednesday, 14 March 2018

Kutch kurti - - 2

Hi friends, I have been working on the Kutch kurti, I have finished the Kutch work for the border. Hope you all like it.

Then border has been done using the simple  sixteen  square motif. I have already uploaded the step by step explanation in my blog.

Here is a close up. 

New addition. Work still on. How is it.

Saturday, 10 March 2018

Kutch kurti - - 1

Hi friends, it's been a long time since I did some kutcwork. So I took a green cloth and here you are.

I have drawn the front neck on one side.
Now if we fold the cloth inside out and pat the cloth, we will get the design on the other side too. 

Now I have drawn the front neck pattern of Kutch work using white carbon. 


As I am planning to wear a black pant for this which has white design in between, so I will be using black and white thread here. 

A closeup. For you. 


Work is on for the border. Thought I will post an update today. 

Saturday, 3 March 2018

Chikanwork kurti - - 2

Hi friends I have completed the Centre.
Here is a closeup. 
I have used herringbone stitch at the back. Bullion knot, lazy daisy stitch and double chevron using pink and white colours. 
Started working on the sides. There was a small confusion about the inclusion of green to bring a contrast to the kurti.

I tried a survey with my fb group and decided I will stick with pink and white. So I made a few changes. 
Considering this as Day 1. I want to see how long I take to finish the sides. 
End of day 2

End of day  4

This is called double pronged approach. I have started from bottom part as well. Almost come till the Centre. Wish me luck friends.